(A practical, safety-first guide for reliable setup and quicker shooting)
A well-mounted and properly zeroed red dot sight reduces the time between spotting a target and placing an accurate shot. Whether you mount the optic on a rifle, carbine, PCC, or pistol, the steps are the same: select the right mount, secure the sight, align it roughly, then fine-tune on the range. Follow safety rules first and take your time to get a repeatable setup.
Safety first
Always clear the firearm before you start. Remove the magazine and check the chamber visually and physically. Work in a controlled area and keep the muzzle pointed in a safe direction. For live-fire zeroing, use eye and ear protection. If you are unsure about any step, seek help from a qualified instructor or gunsmith.
What “mounting” and “zeroing” mean
Mounting is the mechanical process of attaching the sight so it stays fixed under recoil. Zeroing is the process of making the sight’s point of aim match the bullet’s point of impact at a chosen distance. Both steps must be done carefully if you want the sight to be fast and reliable.
Tools and kit you will need
-
Correct mount or adapter for your optic footprint.
-
Torque wrench or driver set with appropriate bits.
-
Allen/hex keys for the sight screws.
-
Small bubble level (prevents cant).
-
Bore sighter (laser or mechanical) to speed initial alignment.
-
Stable rest or sandbags for the firearm during live-fire.
-
Paper target with a clear aiming point.
-
Notebook to record settings and environmental notes.
-
Low-strength (blue) thread locker only if the manufacturer allows it.
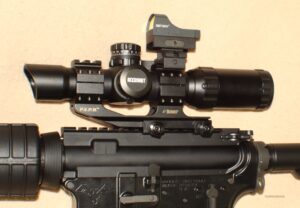
Step 1 — pick the right mount and height
First, confirm the optic fits the mount footprint (for example, RMR, Aimpoint T-series, Holosun). Next, decide whether to co-witness with iron sights. Absolute co-witness aligns the irons through the red dot; lower 1/3 co-witness keeps more of the sight window clear while still allowing backup sight use. Finally, check cheek weld: a lower mount usually gives a faster, more natural sight picture.
Step 2 — install and torque correctly
Begin by loosely fitting the mount to the rail and hand-starting the sight screws. Ensure the sight sits square and is not twisted. Then, using a torque driver, tighten screws in small, even steps to the manufacturer’s recommended values. If torque specs are not available, tighten progressively and evenly — firm but not excessive. Avoid permanent thread lock unless specified; many manufacturers recommend none or only low-strength thread locker. Check that the sight is level laterally and front-to-back before finalizing.
Step 3 — perform a quick bore-sight
Bore-sighting gets you on paper and saves ammunition. You can use a laser bore-sighter or, for bolt rifles, look down the bore and center a distant target. Then adjust the red dot so the dot is roughly on the same point. After this step, make any final torque checks and confirm the sight remains level.
Step 4 — choose a zero distance
Select a zero distance based on your platform and intended use. For close-quarters and fast acquisition, 25 meters/yards is common. A 50 m practical carbine zero works well for general purpose rifles and offers predictable trajectories to 100 m. If you require precision at range, use a 100 m zero. Pick a distance, then stick with it while testing.
Step 5 — live-fire zeroing (practical routine)
-
Set up a stable rest and your target at the chosen distance.
-
Fire a three-shot group from a supported position while aiming at the same precise point for each shot.
-
Measure the group center against your aim point and note the offset.
-
Adjust windage and elevation on the sight according to the click value (check the manual for click = dot movement; common values are 1 MOA or 0.5 MOA).
-
Fire another three-shot group and repeat until the point of aim matches the point of impact.
-
Finish with a five-shot confirmation group and record the final settings and conditions (ammo brand, temperature, range) in your notebook.
Step 6 — practice and verify
After zeroing, practice drawing and shouldering to confirm the sight is fast to pick up during transitions. Test the sight from different shooting positions: standing, kneeling and prone. Also fire a longer string of rounds to confirm the mount holds under sustained firing. If the zero shifts, re-check mount torque and level.
Dot size, brightness, and parallax — practical guidance
-
Dot size: Small dots (1–2 MOA) aid precision. Larger dots (3–6 MOA) speed acquisition at close range. Choose based on typical engagement distances.
-
Brightness: Use enough brightness to be visible without washing out the target. In daylight, higher settings help; in low light, dial it down. If the optic has an auto-brightness mode, verify it behaves predictably.
-
Parallax: Most quality red dots have minimal parallax at practical ranges, but keep your head position consistent to avoid slight POI shifts at extreme offsets.
Common problems and how to fix them
-
Dot moves after firing: Re-check mounting torque and screws; clean mating surfaces to remove debris or burrs.
-
Sight cant causes POI shift: Use a bubble level to ensure the sight and rail are square. Re-install if necessary.
-
Turrets feel loose or inconsistent: Mark current turret position, re-test, and if the play continues contact the manufacturer or a gunsmith.
-
Zero lost after removing the sight: Unless you use precision quick-detach mounts rated for return-to-zero, expect to re-zero after re-mounting. Consider QD mounts designed for repeatability.
Maintenance and battery care
Keep lenses clean with a proper cloth and solution. Replace batteries on a schedule — do not wait for failure. Store a spare battery in your kit. Also check screws and mounts periodically, especially after heavy use. Follow the optic maker’s maintenance instructions to avoid voiding warranties.
When to get professional help
If the mount surface looks damaged, if the sight body is bent, or if you cannot achieve a consistent zero despite following the steps, stop and consult a qualified gunsmith. Also seek professional advice when you are unsure about torque figures or thread locker use for a particular optic.
Quick troubleshooting checklist
-
Firearm cleared and safe to handle.
-
Sight mounted square and torqued evenly.
-
Bore-sighted before live fire.
-
Group, adjust, and repeat until POA = POI.
-
Confirm with a final five-shot group and during practical drills.
Final tips for faster target acquisition
Practice your cheek weld and sight presentation until the dot appears instinctively. Match the dot size to your typical engagement range. Keep batteries charged and lenses clean. Above all, train realistically — speed without accuracy is not useful. Small, regular practice sessions will build the muscle memory you need to use the red dot effectively under stress.
A properly fitted and zeroed red dot greatly improves confidence and accuracy. If you want, I can also produce a one-page printable checklist for range zeroing, or adapt this guide for a specific optic model and firearm platform — tell me the brand and model and I’ll tailor the steps and torque advice.
Read: Best Self-Defence Gadgets for Ride-Sharing Drivers in Pakistan